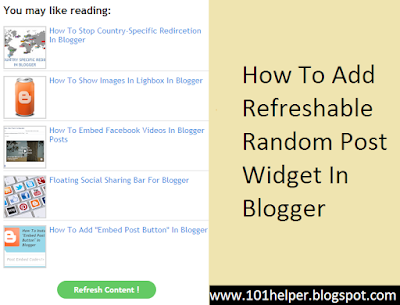
 I am again posting about random post widget and this is because I have made a special random post widget that can be refreshed by simply clicking on a button, I am also using this widget and so I decided to share it with you. You might be thinking why I am sharing this widget because you already have this widget but this is not an ordinary random post widget. It is a special widget and your visitors can refresh content and hence you have more reach to your older posts.
This widget is more good for big blogs which have 100 posts and visitors visit only a few pages. If you have same problem then this widget will help you, how ? the answer is obvious ! For example a visitor visits your blog from Google and read your post and see your ordinary random post widget and all the post he see doesn't grab his interest then he just leave your blog but if there is a refresh button he will just click on it and get some fresh content that will grab his interest and hence every visitor will give you atleast 5 views. I have tried this widget and it really multiply page views.
Another special thing about this widget is if your visitor doesn't refresh content it will be refreshed automatically after given time so your visitor gets fresh content any way and you get your traffic multiplied.
Features:
1. Refreshable content is available to visitors.
2. Automatically refreshable as well as can be refreshed by refresh button.
3. More exposure to visitors (old posts get reach ).
4. Increase your page views upto 5 pageviews / person.
Features:
1. Refreshable content is available to visitors.
2. Automatically refreshable as well as can be refreshed by refresh button.
3. More exposure to visitors (old posts get reach ).
4. Increase your page views upto 5 pageviews / person.
What you need to install this widget ?
1. A Blogger blog
2. A free hosting like 000webhost or any other webhost to store your code on.
3. 5 minutes to follow below steps
Similar widgets to increase your traffic:
1. Simple Random Posts Widget For Blogger
2. Random Post Widget Lite Version For Blogger Mobile Version
3. Vertical Related Posts Widget For Blogger Desktop And Mobile Site
4. Engageya Recommendation/Related Post Widget For Blogger
1. Simple Random Posts Widget For Blogger
2. Random Post Widget Lite Version For Blogger Mobile Version
3. Vertical Related Posts Widget For Blogger Desktop And Mobile Site
4. Engageya Recommendation/Related Post Widget For Blogger
Steps to Install Refreshable random post widget:
To add refreshable random post widget in your blog your need to follow below steps.
Step 1: Go to 000webhost and signup for a free account, enter your email, password and hosting website name(e.g myrandompost).
Step 2: Go to your email and click on the verification link to verify your account in the email from 000webhost.
Step 3: After confirming your account click on "MANAGE WEBSITE".
Step 4: Click on "UPLOAD OWN WEBSITE".
Step 5: Click on the icon as shown in the below image to create a file.
Step 6: Name it "index.html" and click on create.
You are almost done keep going !
Step 7: Copy below code:
| <head> | |
| <meta http-equiv="refresh" content="40"> | |
| </head> | |
| <div id="important"> | |
| <style> | |
| #important h3 { font-family: trebuchet ms; position: relative; top: 5px; } | |
| #random-posts li {list-style: none;padding: 3px 0px;border-bottom: 1px solid #ddd;} | |
| #random-posts a {color:#3993e2;text-decoration:none;} | |
| #random-posts a:hover {text-decoration:none} | |
| #random-posts li:last-child {border:0} | |
| #random-posts li { margin-bottom: 5px; list-style-type: none; width: 100%; float: left; }#random-posts img { float: left; margin-right: 5px; border: 2px solid #D9D9D9} | |
| #random-posts {padding: 0;width: 24%;height:435px;padding: 0 0 0 5px;width:100%;list-style-type: none;padding: 0px;} | |
| #random-posts a {font-size: 14.3px;font-family:trebuchet ms;} | |
| #fresh { width: 100%; text-align: center; position: relative; top: 10px; } | |
| #fresh a {font-family: trebuchet ms; font-size: 14px; font-weight: bold;color: #fff; background: #64ca64; padding: 8px 30px; width: 100%; text-decoration: none; border-radius: 100px; } | |
| </style> | |
| <h3>You may like reading:</h3> | |
| <ul id="random-posts"> | |
| <script> | |
| var randomposts_number = 5; | |
| var randomposts_chars = 0; | |
| var randomposts_details = 'no'; | |
| var randomposts_thumbnails = 'no' | |
| var randomposts_comments = 'Comments'; | |
| var randomposts_commentsd = 'Comments Disabled'; | |
| var randomposts_current = []; | |
| var total_randomposts = 100; | |
| var randomposts_current = new Array(randomposts_number); | |
| function randomposts(json) { | |
| total_randomposts = json.feed.openSearch$totalResults.$t | |
| } | |
| document.write('<script type=\"text/javascript\" src=\"https://101helper.blogspot.com/feeds/posts/default?alt=json-in-script&max-results=0&callback=randomposts\"><\/script>'); | |
| function getvalue() { | |
| for (var i = 0; i < randomposts_number; i++) { | |
| var found = false; | |
| var rndValue = get_random(); | |
| for (var j = 0; j < randomposts_current.length; j++) { | |
| if (randomposts_current[j] == rndValue) { | |
| found = true; | |
| break | |
| } | |
| }; | |
| if (found) { | |
| i-- | |
| } else { | |
| randomposts_current[i] = rndValue | |
| } | |
| } | |
| }; | |
| function get_random() { | |
| var ranNum = 1 + Math.round(Math.random() * (total_randomposts - 1)); | |
| return ranNum | |
| }; | |
| </script> | |
| <script> | |
| function random_posts(json) { | |
| for (var i = 0; i < randomposts_number; i++) { | |
| var entry = json.feed.entry[i]; | |
| var randompoststitle = entry.title.$t; | |
| if ('content' in entry) { | |
| var randompostsnippet = entry.content.$t | |
| } else { | |
| if ('summary' in entry) { | |
| var randompostsnippet = entry.summary.$t | |
| } else { | |
| var randompostsnippet = ""; | |
| } | |
| }; | |
| randompostsnippet = randompostsnippet.replace(/<[^>]*>/g, ""); | |
| if (randompostsnippet.length < randomposts_chars) { | |
| var randomposts_snippet = randompostsnippet | |
| } else { | |
| randompostsnippet = randompostsnippet.substring(0, randomposts_chars); | |
| var whitespace = randompostsnippet.lastIndexOf(" "); | |
| randomposts_snippet = randompostsnippet.substring(0, whitespace) + "…"; | |
| }; | |
| for (var j = 0; j < entry.link.length; j++) { | |
| if ('thr$total' in entry) { | |
| var randomposts_commentsnum = entry.thr$total.$t + ' ' + randomposts_comments | |
| } else { | |
| randomposts_commentsnum = randomposts_commentsd | |
| }; if (entry.link[j].rel == 'alternate') { | |
| var randompostsurl = entry.link[j].href; | |
| var randomposts_date = entry.published.$t; | |
| if ('media$thumbnail' in entry) { | |
| var randompoststhumb = entry.media$thumbnail.url | |
| } else { | |
| randompoststhumb = "https://blogger.googleusercontent.com/img/b/R29vZ2xl/AVvXsEiShjss3MCVmhKdq5GAPTpRVWQnXPs2GK7VA_h3DIN_oG2cNgF8kpr9F7wwSkn1x5KPdSPYmwgQp9ruPcCpYEm0NNCu05Ff7Q1IxJaMLj6tZtZiyyZY7vV2mFphHd_ad5LTTnxIw55ejLc/s1600/no_thumb.png" | |
| } | |
| } | |
| }; | |
| document.write('<li>'); | |
| document.write('<a href="' + randompostsurl + '" rel="dofollow" target="_parent"><img alt="' + randompoststitle + '" src="' + randompoststhumb + '"/></a>'); | |
| document.write('<div><a href="' + randompostsurl + '" rel="dofollow" target="_parent">' + randompoststitle + '</a></div>'); | |
| } | |
| }; | |
| getvalue(); | |
| for (var i = 0; i < randomposts_number; i++) { | |
| document.write('<script type=\"text/javascript\" src=\"https://101helper.blogspot.com/feeds/posts/default?alt=json-in-script&start-index=' + randomposts_current[i] + '&max-results=1&callback=random_posts\"><\/script>') | |
| }; | |
| </script> | |
| </ul> | |
| </div> | |
| <div id="fresh"><a href="/">Refresh Content !</a></div> |
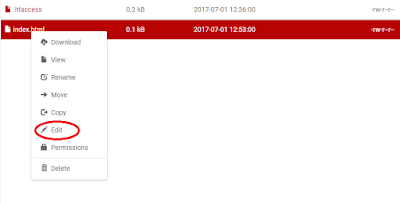
Step 8: Right click on your index file you just created and edit it.
Step 9: Paste the copied code which you copied in step 7 and click on "SAVE & CLOSE"
Make following changes before saving:
1. Replace https://101helper.blogspot.com with your blog URL.
2. Change 40 if you want the widget to refresh automatically after desired time.
3. Change 5 to change number of posts.
Step 10: Now again right click on your file and click on "VIEW".
Congratulations ! now your refreshable widget in ready to be installed in your blog.
Step 11: Copy your file URL from the browser and replace it with YOUR LINK HERE in below code and copy the final code.
<iframe width="90%" id="reloader" src="YOUR LINK HERE"></iframe>
<style>#reloader {width:100%;border: 0;height: 550px;}</style>
<style>#reloader {width:100%;border: 0;height: 550px;}</style>
Note: Do not include https: in your URL, you URL should be without https: otherwise browser will not let it load e.g: //widget.000webhostapp.com/index.html
Final code appearance:
<iframe width="90%" id="reloader" src="//widget.000webhostapp.com/index.html"></iframe>
<style>#reloader {width:100%;border: 0;height: 550px;}</style>
<style>#reloader {width:100%;border: 0;height: 550px;}</style>
Step 12: Go to blogger > layout and click on add a gadget in the sidebar. choose HTML/Javascript.
Step 13: Paste the copied code and click on save.
Open your blog to see refreshable random post widget.
I hope you liked this widget, share your opinion in comments.
Share this post with others because ❤ Sharing is caring !
Search keywords: Refreshable Random Post Widget for Blogger, Random post widget for blogger, iframe random post widget, blogger gadgets, 101helper blogging tutorials.
Rate This Article
Thanks for reading: How To Add Refreshable Random Post Widget In Blogger, Stay tune to get latest Blogging Tips.


